I say we are 'terminal DIYers,' and we try it all: Home/Kitchen Design & Building, Cooking, Baking, Sewing, Gardening, Woodworking, Homeschooling... But the seasons are changing, and in this one I plan to rediscover the artist in myself. I'm stepping out with some ideas and seeing where they take me...and us...at Our Home for Ten (RHome410)!
Thursday, February 28, 2013
This One Speaks for Itself
Wednesday, February 27, 2013
My "Forever Kitchen" at 5 Years

5 years ago yesterday, after 18 months of DIY building, and almost 2 years with the 10 of us
We're still not finished with all the details, as you probably know, but at that point not all the cabinet doors were finished, the wood for the island top was piled on the island, dishwasher panels were yet to be made, carpentry tools sat amongst our cooking tools, etc., etc.
But we were thrilled to have a working stove and running water, and permission to turn them on! We had stir-fry that night, having long wondered how it would be to actually stir-fry over a gas flame, as opposed to pretty much steaming a similar dinner on an electric range.
 |
| It was a welcome sight to see this go away!!!!! It did it's job for us, and we'd been thankful it existed... But we were more than finished with it. |
I plan to follow up with how our choices have endured the last 5 years. Most things I'm very happy about. Some things I would've done differently. More of that ahead.
Posted by
RHome410

My "Forever Kitchen" at 5 Years
2013-02-27T10:48:00-08:00
RHome410
DIY|Kitchen|kitchen at 5 yrs|
Comments
Labels:
DIY,
Kitchen,
kitchen at 5 yrs
Tuesday, February 26, 2013
Rotissing: Didn't Love It
I know using it once probably isn't giving it its due, but I am not feeling a connection with the rotisserie feature in the new oven.
I will tell you what I did and what I didn't like and maybe those of you with more experience can tell me how to do better, or get more out of this thing.
I started with 2 roasting chickens. I knew I was supposed to tie them up, particularly so the wings didn't hang and catch on the rack, preventing the unit from turning properly. I should've looked up a diagram online, but I was a bit lazy and figured I could do well enough to tame the wings. I also used button thread, because of not knowing where someone had put the string. With a bad tying job with the wrong material, I was off to a good start!
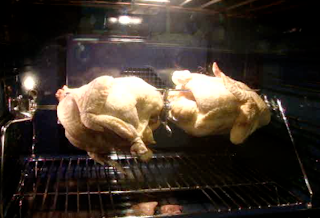
Following the diagram in the manual, I turned the oven onto broil at 355 degrees. I put the pan with the rotisserie contraption at the bottom rack position, as instructed, so the shaft inserted into the proper space in the back of the oven. It turned! So I'd done that part correctly.
Everything looked good and the chicken was browning beautifully. But that was the outside. How long it would take, and what was going on in the inside was only a guess, since with the rotisserie, I can't, of course, use the probe.
I noticed all that empty space under the chickens "going to waste, " so cut up potatoes, garlic, and onions to take advantage of the hot oven, and whatever dripping juices would be provided to baste them.
After about 50 minutes, I used my instant read thermometer to check. It wasn't to proper internal temperature, so I had to continue to check every 10 minutes or so. This was disappointing to do, since with every prick, lovely juices poured from the chicken, no longer inside doing their job to keep the meat moist.
The legs were loosening, the moisture was visibly boiling under the skin, but the thigh and breasts continued to stay too cool for what seemed to me to be too long.
Finally, they jumped past the temperature I was looking for, and I removed the pan from the oven. THAT was a feat. It wasn't so bad going in... With everything cool, I didn't notice how awkward and heavy the unit and 2 chickens were. It was another story when the whole thing was sizzling and about 400 degrees. I didn't care if my arms bumped the metal stand when I put it in, but not so when getting it out!
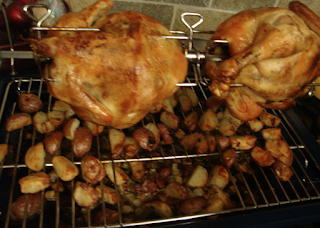 Now I had 2 steaming chickens locked onto a hot, metal contraption. I let them rest, of course, but they were still hot, as I'd sure want them for serving.
The birds were so done (and the veggies well past ready, too), the meat and bones of the extremities fell to pieces as I attempted removal from the rotisserie unit. (It was a messy process, and I didn't stop to wash my hands and get photos.) I guess I could've cut the meat from the carcass without removing them, but then I'd risk undesirable knife-metal skewer contact, so I'm not sure that's a better remedy. Plus, I just don't know how I'd cut the breast into servable portions that way.
I served what I thought was a mess of meat and chicken parts. It was moist enough, I guess. Frankly, I was exhausted and disappointed by that time and really didn't notice. But I don't remember noticing dryness, so I guess it wasn't too bad, especially considering the overcooking.
I'm just not convinced this is better than rack-roasting while using the probe. It seems like a lower oven temperature might help.
Any other suggestions of why I had these problems, and how my experience might improve for next time?
Any suggestions of food choices that would be a better fit for success with the rotisserie process?
I will tell you what I did and what I didn't like and maybe those of you with more experience can tell me how to do better, or get more out of this thing.
I started with 2 roasting chickens. I knew I was supposed to tie them up, particularly so the wings didn't hang and catch on the rack, preventing the unit from turning properly. I should've looked up a diagram online, but I was a bit lazy and figured I could do well enough to tame the wings. I also used button thread, because of not knowing where someone had put the string. With a bad tying job with the wrong material, I was off to a good start!
Following the diagram in the manual, I turned the oven onto broil at 355 degrees. I put the pan with the rotisserie contraption at the bottom rack position, as instructed, so the shaft inserted into the proper space in the back of the oven. It turned! So I'd done that part correctly.
Everything looked good and the chicken was browning beautifully. But that was the outside. How long it would take, and what was going on in the inside was only a guess, since with the rotisserie, I can't, of course, use the probe.
I noticed all that empty space under the chickens "going to waste, " so cut up potatoes, garlic, and onions to take advantage of the hot oven, and whatever dripping juices would be provided to baste them.
After about 50 minutes, I used my instant read thermometer to check. It wasn't to proper internal temperature, so I had to continue to check every 10 minutes or so. This was disappointing to do, since with every prick, lovely juices poured from the chicken, no longer inside doing their job to keep the meat moist.
The legs were loosening, the moisture was visibly boiling under the skin, but the thigh and breasts continued to stay too cool for what seemed to me to be too long.
Finally, they jumped past the temperature I was looking for, and I removed the pan from the oven. THAT was a feat. It wasn't so bad going in... With everything cool, I didn't notice how awkward and heavy the unit and 2 chickens were. It was another story when the whole thing was sizzling and about 400 degrees. I didn't care if my arms bumped the metal stand when I put it in, but not so when getting it out!
 Now I had 2 steaming chickens locked onto a hot, metal contraption. I let them rest, of course, but they were still hot, as I'd sure want them for serving.
 The birds were so done (and the veggies well past ready, too), the meat and bones of the extremities fell to pieces as I attempted removal from the rotisserie unit. (It was a messy process, and I didn't stop to wash my hands and get photos.) I guess I could've cut the meat from the carcass without removing them, but then I'd risk undesirable knife-metal skewer contact, so I'm not sure that's a better remedy. Plus, I just don't know how I'd cut the breast into servable portions that way.
I served what I thought was a mess of meat and chicken parts. It was moist enough, I guess. Frankly, I was exhausted and disappointed by that time and really didn't notice. But I don't remember noticing dryness, so I guess it wasn't too bad, especially considering the overcooking.
I'm just not convinced this is better than rack-roasting while using the probe. It seems like a lower oven temperature might help.
Any other suggestions of why I had these problems, and how my experience might improve for next time?
Any suggestions of food choices that would be a better fit for success with the rotisserie process?
Posted by
RHome410

Rotissing: Didn't Love It
2013-02-26T13:02:00-08:00
RHome410
appliances|Kitchen tools|oven|oven 7|rotisserie|
Comments
Labels:
appliances,
Kitchen tools,
oven,
oven 7,
rotisserie
Thursday, February 21, 2013
Parent-Kid Date: Princess Artiste
Because Hubby was stuck at school, awaiting a lumber delivery that never showed up (Grr), he missed a day with Princess Artiste and me in the Big City. And what a beautiful day it was!
Princess Artiste has been commissioned by a teacher at school to create art tiles similar in style to a set he'd seen in the Patricia Rovzar Gallery, created by former architect, now artist, Vicki Grant. (I encourage you to have a look at her stuff... It's amazing. As a wanna-be architect and an appreciator of design elements, myself, her work has roots and a style I love. Also, in wandering to galleries she linked, I came across the work of Destiny Allison at the Brunner Gallery, which I also loved.)
ANYway, Hubby and the princess were scheduled to accompany this man to the gallery to have a look at the tiles during Christmas break, but that never happened. Eager to start the project, Princess Artiste asked me to take her to see them last week.
As it turned out, the exhibit at the gallery had long been changed, and the tiles were no where to be seen. We enjoyed studying the works of Joseph Maruska and Deloss Webber, instead... Which were not tiles, nor ceramic, but beautiful, inspiring, and interesting.
Not seeing the tiles did not spoil our day in the least. We enjoyed Greek yeeros at Mr. D's at the Pike Place Market, and of course, I had to make a run through Sur la Table, to see fun kitchen wares. We walked to Pioneer Square, where we people watched from Starbucks, enjoying some coffee/tea beverages, and then trekked back to the ferry terminal to head home.
With an hour to spare, we decided to walk up the waterfront, north along Alaskan Way. At that point, still having drinks in our hands, we couldn't explore any of the shops, so we just looked in windows and kept going...
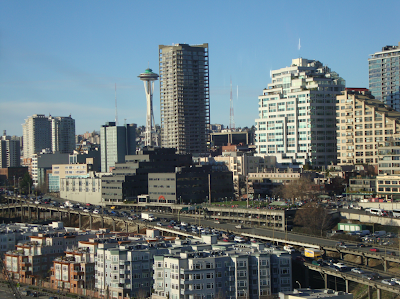
Until we were drawn toward the Big City's newest attraction, the "Great Wheel." Frankly, it's not as large as I'd expected from the first hype they put out before construction, but it's still pretty cool. Who could resist flying up over the city and waterway on a beautiful, clear day like we had? Not us. This is the first time I remembered the camera was in my pocket...

We got off the big ferris wheel with only 5 minutes to get to the ferry terminal (several blocks away), buy our tickets, and load onto the boat... so we chose to miss it and play for another hour.
We walked further down Alaskan Way than we ever had until we reached the Maritime and Convention Center, where we enjoyed more fabulous views.
Now drinkless, we were able to visit a couple of the shops that particularly intrigued the princess, and in search of a fun key chain, she found one that amused her, and decided we should have our little elephant twins.
This time we made the ferry, as intended, and rode home.
Princess Artiste has been commissioned by a teacher at school to create art tiles similar in style to a set he'd seen in the Patricia Rovzar Gallery, created by former architect, now artist, Vicki Grant. (I encourage you to have a look at her stuff... It's amazing. As a wanna-be architect and an appreciator of design elements, myself, her work has roots and a style I love. Also, in wandering to galleries she linked, I came across the work of Destiny Allison at the Brunner Gallery, which I also loved.)
 |
| from Patricia Rovzar Gallery |
As it turned out, the exhibit at the gallery had long been changed, and the tiles were no where to be seen. We enjoyed studying the works of Joseph Maruska and Deloss Webber, instead... Which were not tiles, nor ceramic, but beautiful, inspiring, and interesting.
 |
| The view up 1st Ave from Starbucks. Image thanks to this post on StarbucksMelody.com |
With an hour to spare, we decided to walk up the waterfront, north along Alaskan Way. At that point, still having drinks in our hands, we couldn't explore any of the shops, so we just looked in windows and kept going...
Until we were drawn toward the Big City's newest attraction, the "Great Wheel." Frankly, it's not as large as I'd expected from the first hype they put out before construction, but it's still pretty cool. Who could resist flying up over the city and waterway on a beautiful, clear day like we had? Not us. This is the first time I remembered the camera was in my pocket...

We got off the big ferris wheel with only 5 minutes to get to the ferry terminal (several blocks away), buy our tickets, and load onto the boat... so we chose to miss it and play for another hour.
We walked further down Alaskan Way than we ever had until we reached the Maritime and Convention Center, where we enjoyed more fabulous views.
Now drinkless, we were able to visit a couple of the shops that particularly intrigued the princess, and in search of a fun key chain, she found one that amused her, and decided we should have our little elephant twins.
 |
| This is mine. Hers is with her at school. |
This time we made the ferry, as intended, and rode home.
Posted by
RHome410

Parent-Kid Date: Princess Artiste
2013-02-21T10:15:00-08:00
RHome410
parenting|Washington site-seeing|
Comments
Labels:
parenting,
Washington site-seeing
Wednesday, February 20, 2013
Stoneless Pizza
Without an oven for a couple of weeks, we could not do without pizza any longer, even though my special, new Gaggenau pizza stone and element weren't scheduled to arrive for weeks after the oven did. I thought maybe I could make do with my regular pizza stone, and just be careful about placement and temperature, but with the shallower dimension of the Gagg oven, it would just barely fit, but touched or almost touched the glass, which seemed like an unnecessarily dangerous situation.
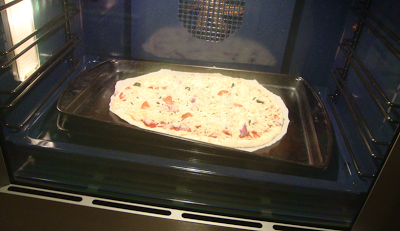 So, instead of remembering back to when I baked pizzas in a pan (duh), I decided to try to replicate stone baking as closely as I could with what I had.
This meant trying to use cookie sheets, doubled to add weight and thickness for heat retention, on one of the baking tray racks, heated to 500 degrees. This resulted in a warped cookie sheet (it returned to proper shape when cool), and white-bottomed pizza. After a couple of tries, I finally wondered WHY I'd thought using a pan on another pan was a good idea, so removed the pizza pan, and placed the pizza right on the baking sheet rack. That worked better, giving me a little color on the crust, but something still wasn't right.
It was a television commercial for take-and-bake pizza, admonishing people to turn their ovens to 425 degrees and come pick up a pizza, that reminded me how I used to bake pizzas, pre-stone.
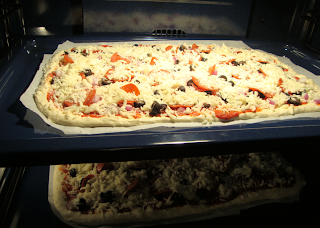
So I regained some common sense, and the next time I turned the oven to 425, but wasn't sure which mode to use. Gaggenau seems to think convection (hot air & fans only-- I have no idea where the 'hot' is coming from) should be used for almost everything. This is also the mode for multi-rack baking, so I thought I could bake two at once. Both pizzas browned nicely, but we had white and wimpy pizza bottoms. Yuck.
Time to try another mode, which meant cooking one pizza at a time. Convection with bottom heat added didn't do much better, since the moving hot air still cooked the tops much faster than the crust.
I turned the oven to bottom heat only (the closest thing to regular old 'bake'), and we had great results... Golden and crispy crust to match the bubbly, brown tops.

The only problem? 20 minutes per pizza! Even though I was making cookie sheet sized pies, the lag time was big for the size crowd we have waiting. We'll be very happy to have the pizza stone accessory, which, according to my salesman, is still expected at the end of next week. --And at a good discount, because of the denting issues we had with the oven delivery. Yay!
 So, instead of remembering back to when I baked pizzas in a pan (duh), I decided to try to replicate stone baking as closely as I could with what I had.
 This meant trying to use cookie sheets, doubled to add weight and thickness for heat retention, on one of the baking tray racks, heated to 500 degrees. This resulted in a warped cookie sheet (it returned to proper shape when cool), and white-bottomed pizza. After a couple of tries, I finally wondered WHY I'd thought using a pan on another pan was a good idea, so removed the pizza pan, and placed the pizza right on the baking sheet rack. That worked better, giving me a little color on the crust, but something still wasn't right.
It was a television commercial for take-and-bake pizza, admonishing people to turn their ovens to 425 degrees and come pick up a pizza, that reminded me how I used to bake pizzas, pre-stone.

So I regained some common sense, and the next time I turned the oven to 425, but wasn't sure which mode to use. Gaggenau seems to think convection (hot air & fans only-- I have no idea where the 'hot' is coming from) should be used for almost everything. This is also the mode for multi-rack baking, so I thought I could bake two at once. Both pizzas browned nicely, but we had white and wimpy pizza bottoms. Yuck.
 |
| An old, rimless cookie sheet became my 'pizza peel' for loading these larger, rectangular pizzas into the oven |
I turned the oven to bottom heat only (the closest thing to regular old 'bake'), and we had great results... Golden and crispy crust to match the bubbly, brown tops.

 |
| "Hot Air Only" - A.K.A. Convection The hanger shape indicates the heat is rising. The other symbol in the upper left show the lower oven is on. |
 |
| "Hot Air & Bottom Heat"- Equivalent to Convection Bake, I'd guess |
 |
| "Bottom Heat Only" This would close to 'Bake,' except on some ovens, like the Wolf, the top element is used to a small extent even for Bake. There was no mode with only bottom heat. |
The only problem? 20 minutes per pizza! Even though I was making cookie sheet sized pies, the lag time was big for the size crowd we have waiting. We'll be very happy to have the pizza stone accessory, which, according to my salesman, is still expected at the end of next week. --And at a good discount, because of the denting issues we had with the oven delivery. Yay!
Previous related posts:
|
|
Sunday, February 17, 2013
Ship Shape? Not.
 |
| Photo Source |
I may not look like this yet... All dried up, rusty and deteriorated, and unable to move.
 |
| Photo Source |
But I'm afraid I'm starting to look like this... Listing to the side of what's healthy, with my cargo shifting precariously and unattractively, and pushing my inner contents out of balance.
While we were building our house, I pretty suddenly put on 10 pounds and had to trade my size 6s for 10s. I figured it was hormones or something, and felt like it would never drop back off. But a couple years ago, whoosh! it went, and I was barely, but definitely, back into 6s... Which was particularly nice for the weddings.
Then during April 2012, the 10 lost pounds were found again...mostly around my middle. I think it was due to imbalances in my system due to stress over my mom's difficult heart surgery, because my dietary and activity habits didn't change. The sad thing is, it hasn't dropped back off after the stressful period passed.
 The other all-too-'interesting' thing that happened recently is my usually low cholesterol numbers jumped up. My total increased by 40 points, which confounded my doctor a bit. He said weight and cholesterol levels are linked, but he wouldn't have expected 40 points with 10 pounds.
  |
| Image courtesy of Suat Eman/ FreeDigitalPhotos.net |
I have cut back on the carbs, so I hope the cholesterol situation is better, but the weight sure isn't. Like with budgeting, I don't have any major calorie vice I can cut, like alcohol, soda, or milkshakes, and I am a fairly healthy eater, so I'm not sure how to better my diet. My gynecologist said she won't discuss any other solutions to weight with me until I have a regular exercise routine. Claiming to be an active mom of many with stairs in my house, places to go and things to do, and promising that I do get up and move more than I used to, just doesn't do it for her. She wants to know how many minutes of what focused physical activity/activities, how many times a week.
 |
| From My Weight Makeover |
So I thought if I posted the truth of things here, it would force some accountability in keeping regularly active...gaining strength and stamina. Hopefully, my metabolism will wake up, the weight will drop, and that tummy fat will disappear.
Current Stats:
Weight: 142 pounds (goal: 127)
Blood pressure: OK at 110/68 to 120/70
Cholesterol: 214 (goal: back down to under 175 with favorable HDL to LDL ratio)
Weekly exercise: Little to none (goal: 30 minutes or more, 5 days per week)
Sleep per night: 5 - 5 1/2 hours (goal: 8 hours+)
I suppose I should post a "Before" photo... But maybe when I have a great "After" to post with it!
Posted by
RHome410

Ship Shape? Not.
2013-02-17T17:32:00-08:00
RHome410
aging/health|diet|fitness|healthy eating|personal well-being|
Comments
Labels:
aging/health,
diet,
fitness,
healthy eating,
personal well-being
Subscribe to:
Posts (Atom)


